Facilitator’s Guide
Notes for facilitators
These notes were developed to guide facilitators of the Natural Playgrounds Toolkit. To meet the needs of each individual group, facilitators will need to adapt as required.
Target group of the workshop
- ECD
- ECD stands for Early Childhood Development.
This workshop will be useful to many people, such as volunteers on management committees, managers and staff (at least ECD NQF level 4 or 5) of schools, provincial and district officials, social service professionals who are employed by schools, ECDs, NPOs, DSD, sports and recreation departments, and municipal officials. Organisations are assumed to have specialists in ECD who are able to train using the toolkit.
Purpose of the workshop
- Needs Assessment
- A systematic process for determining and addressing needs, or gaps between current conditions (where we are now) and desired conditions or ‘wants’ (where we want to be).
- Action plan
- A document that lists the steps that must be taken in order to reach your goals or objectives.
People who attended this workshop and received the materials are able to:
- Describe the importance of play.
- Discuss strategies to engage communities.
- Implement a playground needs assessment.
- Develop a playground action plan.
- Track the progress and success of the project.
Duration
The duration of this workshop is a minimum of twelve hours. It can be presented over two days or session by session on different days if it is more convenient for the group.
Selection of facilitators
The ideal facilitator for this programme will have:
- at least five years of experience in the early childhood development field
- a demonstrated ability to work effectively with people whose cultures are different from their own, including differences in race, religion, ethnicity, national origin, gender, socio‐economic status, level of education, age, etc
- prior experience as a facilitator and knowledge of outcome‐based training
- a command of the language of instruction and terminology related to early childhood development.
Selection of training venue
The ideal training venue has:
- adequate free parking and easy access to public transport
- enough light, but also the possibility to make the room dark enough to see PowerPoint slides, if the facilitator decides to use these in their presentation
- air conditioning, fans, heaters, or other ways to make the room temperature comfortable
- a place to prepare and serve tea and refreshments
- limited disturbances
- good acoustics so that your voice will carry
- enough space to comfortably accommodate your group and their movement, including small group discussions
- toilet facilities
- accessibility for people with disabilities.
You must familiarise yourself with the venue beforehand, so that you can check that you can set up the room as you require. This includes checking for enough electrical outlets for a laptop and data projector if you choose to use these, planning for your position with a table, etc. If you plan to use a data projector, you must ensure that there is either a screen or a smooth wall to project against; also check to see that the projector works so you can make alternative arrangements before the audience arrives, if necessary.
Toolkit package
- Facilitator’s guide (this section of the toolkit) that guides the facilitator in implementing the workshop.
- Participants’ toolkit with information for participants to use during training; this can either be access to the toolkit on an electronic device, printed copies of relevant sections, or both.
Tips for handling the workshop
Prepare yourself with the necessary material to conduct a workshop.

The most important tool is you
See that you are neatly dressed and groomed. Use movement wisely and engage your audience with gestures and facial expressions.
Set up of workshop space
The ideal room setup permits easy viewing of the facilitator and slide projections. The facilitator should be able to move about and engage the audience. It should also facilitate ease of group discussions. Figure 17 gives examples of possible workshop arrangements.
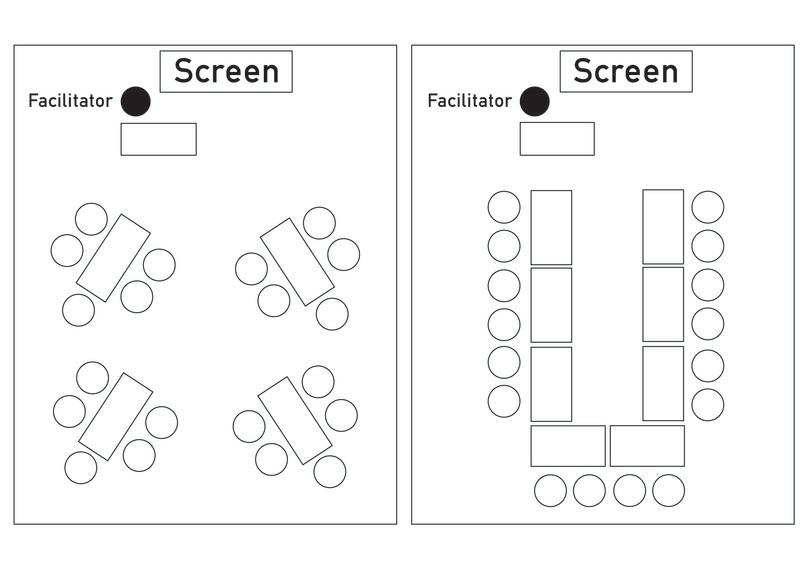
Arrangement of workshop space.
Figure 17 Arrangement of workshop space.
Refreshments
Scheduling enough body and refreshment breaks is vital. Serving refreshments is key as it impacts on the atmosphere and mood of the workshop. Arrange for someone to help you have tea and refreshments ready.
Tips for adult training
Knowledge of a few basic principles that underlie the learning process can guide facilitators in presenting in a way that optimises participants’ learning.
Adults learn because they want to. They know what they need to learn. Adults learn better by doing. This is why we need to actively engage the participants in the learning process. Participant’s involvement has many benefits. It can help to improve retention and generate interest.
Training methods
Facilitator’s role
Your role is to serve as the facilitator of the group’s learning. A good facilitator should be a neutral servant of the group. This is achieved by focussing the group on the given task and overall agenda, suggesting methods and procedures for achieving the task, protecting all group members from personal attack, and remaining non‐defensive and accepting of feedback with goodwill. It is importnant that you help the group to reach win‐win decisions or a common consensus.
Facilitation methods
There are several facilitation methods utilised in this workshop, such as a mini lecture, which is similar to a lecture, but shorter and actively involves some level of group participation.
Multi‐sensory approaches
People process information through different perceptual styles, including auditory and visual. Using a variety of activities to create multi‐sensory experiences can accommodate different learning styles and can help to reinforce skills or knowledge acquired through other senses. Beside your material, enrich the learning experience by offering opportunities for individuals to share relevant knowledge and experiences. Involvement techniques are a must.
Engage the audience with methods like seeking their agreement to a statement, asking for examples or applying your own experience.
Group discussion
Group discussions can take a variety of formats. One form is the structured discussion which involves guided interactions among participants. The facilitator sets the direction and tone of the discussion and keeps the group on track.
Brainstorming
- Resources
- A supply of money, materials, staff, volunteers, and other assets that can be used by the project to effectively achieve its aims.
The facilitator will pose a question or problem to the group and will ask participants to generate as many ideas or responses as possible. The facilitator records each response and at the end discusses the ideas with the group. Brainstorming is an effective method of both generating participant involvement and drawing on the resources of the group to enrich the learning experience.
PowerPoint pointers:
If you choose to create powerpoint slides for your workshop, make sure to practice the slides so you know them. Do not turn your back to the audience and read from the screen. It makes you look unprepared. Rather position the screen of your laptop so you can read from it but make consistent eye contact during the presentation.
Using advocacy
Advocacy is when someone speaks on behalf of or in support of a vulnerable group and their rights and needs with the aim of gaining support or commitment.
When we advocate for natural playgrounds, we want to ensure that:
- The voice of children is heard on playgrounds and its importance for healthy development is reiterated.
- The right of children to play is achieved at a nominal cost.
- The play needs of children are considered when developing playgrounds.
- Those with influence in government departments create a supportive environment for the implementation of natural playgrounds at school level.
Advocacy for the toolkit
The goal for using advocacy in the Natural Playgrounds Toolkit is to gain support and commitment from decision makers for the implementation of natural playgrounds.
In Section 1 of the toolkit, you will find information to use when advocating. Depending on the audience, venue and the amount of time available, you should plan your talk to cover the importance of play in child development, and advocate for natural playgrounds as a solution to providing play opportunities to children at a nominal cost.
Qualities of advocates
- Budget
- A budget is a financial plan that shows what money you expect to have and what money you expect to spend to achieve your plans.
Effective advocates can influence policy and budgets by using facts and strong relationships to educate government officials and the public on the changes they want to bring to play opportunities for young children.
Effective advocates have:
- good communication skills to argue their side
- analytical skills to analyse the situation and argument
- good people skills to make and build connections
- perseverance to keep on trying until they succeed
- creativity to find different ways and angles to present their side
- passion and a firm belief in the cause they are advocating for.
Using participatory workshops
- Stakeholders (Partners)
- People who have an interest in realising the project in favour of the children.
Most of the tools in this toolkit are specifically designed to be used by groups of diverse partners and stakeholders.
- Participatory Workshop
- An interactive workshop that involves participants working together towards a particular objective. It uses tools that stimulate creativity through working together and applying participants’ experiences and expertise.
There are two workshops that cover the tools. At the end of each workshop, a task team is elected to summarise the information gathered in the workshop.
Exploration Workshop guide
Pinpoint stakeholders and where to begin in the creation of your natural playground by facilitating the participation of community members.
When should you run an Exploration Workshop?
Finding a starting point for your playground needs assessment can be daunting. There are so many possible things that could be investigated. This community participation workshop uses the community as experts of their environment to pinpoint issues that can be explored. Certain issues will be explored on the day, others will be identified and then explored by a task team after the workshop.
Before the workshop
Identify facilitators: You will need an experienced person to facilitate the community participation workshop. In addition you will need a co‐facilitator to take notes of the group discussions and feedback. The facilitators need to prepare by:
- Reading through all sections of the Natural Playgrounds Toolkit and ensuring they understand the process of creating a natural playground from start to finish.
- Reading through the necessary tools in the Toolbox and these instructions for this workshop in the Facilitator’s Guide.
Identify participants: Use Tool 1: Partner Finder as a guide to identify as many people as possible to attend the workshop. There should be at least one or two people per category.
Identify a venue: Find a venue that is in the community and close to the existing playground you want to update or the site for the new playground.
Arrange the workshop: Make necessary arrangements for the workshop, such as refreshments, meals, stationery, and devices pre-loaded with the Natural Playgrounds Toolkit. Arrange for a facilitator and two or three note takers. Remember to check for any dietary requirements of participants and cater for the special needs of people with disabilities.
Exploration Workshop schedule
1. Welcome and logistics
- 10 minutes
- 9:00am
Introduce yourself, explain the programme and point out the amenities to participants. State the goal for the workshop and the group rules.
2. Ice breaker
- 15 minutes
- 9:10am
Begin your workshop with an ice breaker. This allows participants to introduce themselves and feel more comfortable.
Stand in a circle, holding a ball. As an example, state your name and a game that you enjoyed playing as a child. Throw the ball to someone else in the circle. When they catch it, they say their name and a game that they enjoyed playing as a child, or something similar, such as their favourite place to play. This person then throws the ball to someone else, who shares a similar thing about themselves. Follow the pattern until everyone has a chance to introduce themselves.
3. Set the scene
- 45 minutes
- 9:25am
Give each participant a copy of the Natural Playgrounds Toolkit to use as a guide during the workshop.
Set the scene for the day by doing a thirty minute presentation on the concepts in the booklet and why the workshop is being held.
4. Define ‘where we want to be’
- 30 minutes
- 10:10am
Use Tool 3: Playground Dreams to explore what you want to include in your playground.
Divide participants into small groups of approximately five people. Each small group follows the instructions on the tool. Each small group provides feedback to the bigger group. Note takers should compile a combined list of ideas from the group feedback.
5. Define the ‘who’
- 30 minutes
- 10:40am
Use Tool 1: Partner Finder to define who has an interest or investment in your playground.
Divide participants into small groups of approximately five people. Make sure participants understand the concept of brainstorming. Each small group follows the instructions on the tool. Each small group provides feedback to the bigger group. Note takers should compile a combined list of ideas from the group feedback.
6. Tea break
- 30 minutes
- 11:10am
Break for tea to allow participants to rest and relax with refreshments. As a facilitator, you can network and answer individual questions or comments if necessary.
7. Define ‘where we are’
- 60 minutes
- 11:40am
Use Tool 2: Playground Map to explore how people experience the playground.
Divide participants into small groups of approximately five people. Each small group follows the instructions on the tool. Each small group provides feedback to the bigger group. Note takers should compile a combined list of ideas from the group feedback.
8. Lunch
- 45 minutes
- 12:40pm
Break for lunch to allow participants to rest and relax with food. As a facilitator, you can network and answer individual questions or comments if necessary.
9. Define ‘what we have’
- 60 minutes
- 1:25pm
Use Tool 4: Resource Inventory to explore what resources are available.
Divide participants into small groups of approximately five people. Each small group follows the instructions on the tool. Let each small group complete the tool by brainstorming. Each small group provides feedback to the bigger group. Note takers should compile a combined list of ideas from the group feedback.
10. Define ‘where we are’
- 30 minutes
- 2:25pm
Use Tool 5: Issue Finder to explore the legal and practical issues of creating a natural playground.
Divide participants into small groups of approximately five people. Each small group follows the instructions on the tool. Each small group provides feedback to the bigger group. Note takers should compile a combined list of ideas from the group feedback.
11. Define ‘where we want to be’
- 30 minutes
- 2:55pm
Use Tool 6: Risk–Benefit Assessment to explore the risks and benefits of loose part play.
Divide participants into small groups of approximately five people. Each small group follows the instructions on the tool. Each small group provides feedback to the bigger group. Note takers should compile a combined list of ideas from the group feedback.
12. Tea break
- 20 minutes
- 3:25pm
Break for tea to allow participants to rest and relax with refreshments. As a facilitator, you can network and answer individual questions or comments if necessary.
13. Elect a task team
- 45 minutes
- 3:45pm
Ask participants to nominate five to ten people to process the information that was gathered during the day. Confirm that the nominees are willing to serve on the task team. If not, ask for another nominee. Make sure to include people who work in the field of early childhood development on the task team.
These activities can be done in one day or over several sessions depending on how much time people have available. The allocated time and starting times indicated can be adjusted to suit each workshop as needed.
Visioning Workshop guide
Develop a shared vision and goals for a natural playground by facilitating the participation of community members.
When should you run a Visioning Workshop?
Once you have had an Exploration Workshop where you have identified stakeholders, problem areas, and services in the community, the next step is to hold a Visioning Workshop for your natural playground.
Before the workshop
Identify facilitators: You will need an experienced person to facilitate the community participation workshop. In addition you will need a co‐facilitator to take notes of the group discussions and feedback. It is best if the same facilitator and co-facilitator who ran the Exploration Workshop also run the Visioning Workshop. The facilitators need to prepare by:
- reading through all sections of the Natural Playgrounds Toolkit and ensuring they understand the process of creating a natural playground from start to finish
- reading through the necessary tools in the Toolbox and these instructions for this workshop in the Facilitator’s Guide.
Identify participants: Invite all participants that attended the Exploration Workshop and invite all partners and stakeholders that were identified using Tool 1: Partner Finder in the Exploration Workshop.
Identify a venue: Find a venue that is in the community and close to the existing playground you want to update or the site for the new playground.
Arrange the workshop: Make necessary arrangements for the workshop, such as refreshments, meals, stationery, and devices pre-loaded with the Natural Playgrounds Toolkit. Arrange for a facilitator and two or three note takers. Remember to check for any dietary requirements of participants and cater for the special needs of people with disabilities.
Visioning Workshop schedule
1. Welcome and recap
- 10 minutes
- 8:30am
Introduce yourself and welcome participants. Summarise where we are in the process of building a natural playground and where we want to get to by the end of the day. Ask for comments on the previous workshop session.
2. Develop a common vision
- 30 minutes
- 8:40am
Divide participants into small groups of approximately five people. Each group is to either draw, write, make a poem, do a rap song or commercial or use any other creative means to share their vision for their playground to the group as a whole in sixty seconds.
Each group has ten minutes to prepare, ten minutes to practice and then there is two minutes per group to present feedback.
Your vision communicates what you believe the right playground will do for your children.
Vision statements should be inspiring and uplifting to everyone involved in the project and easy to communicate. The statement should be short enough to fit on a t-shirt.
Here are a few vision statement examples:
- Inspire kids to play.
- Make time for play.
- Dream a playground.
- When kids play, we all win.
- Play – the work of children.
3. Results of Exploration Workshop
- 30 minutes
- 9:10am
Divide participants into five groups:
- Group 1 get the summary of Tool 2: Playground Map
- Group 2 get the summary of Tool 3: Playground Dreams
- Group 3 get the summary of Tool 4: Resource Inventory
- Group 4 get the summary of Tool 5: Issue Finder
Each group is to discuss the summary for fifteen minutes and then there is two minutes per group to present feedback.
4. Finding priorities
- 30 minutes
- 9:40am
Before the workshop, write out the summary of Tool 3: Playground Dreams on twelve separate pieces of large paper. Each of the categories, (for example, Gross Motor Play,) is written on its own sheet of paper with the corresponding suggestions from the Exploration Workshop written underneath.
Participants must vote for one item in each category by writing their initials next to it. Facilitator is to count the votes, determine a winner in each category, and mark it clearly. If there is a draw, simply revote that one category. Make sure to assure participants that the other ideas are not thrown out, they are simply reserved for another time.
5. Tea break
- 30 minutes
- 10:10am
Break for tea to allow participants to rest and relax with refreshments. As a facilitator, you can network and answer individual questions or comments if necessary.
6. Develop the goals
- 60 minutes
- 10:40am
Use Tool 7: Formulating Objectives to formulate smart objectives by describing exactly what you want to achieve.
Divide participants into twelve groups. Each group gets one of the twelve priorities to work with (or more than one if there are less than twelve groups). Make sure participants understand what they need to do by going through the tool with them, using examples. Let each group complete the tool by brainstorming. Remind them that they must keep the information discussed earlier (results of Exploration Workshop) in mind when writing up objectives. They have fifteen minutes to do this. Each small group provides feedback to the bigger group.
7. Activity plan
- 40 minutes
- 11:40am
Use Tool 8: Activity Plan to see that everything you have planned can be completed on time and on budget.
Divide participants into twelve groups. Each group gets one of the twelve priorities to work with (or more than one if there are less than twelve groups). Make sure participants understand what they need to do by going through the tool with them, using examples. Let each group complete the tool by brainstorming. Remind them that they must keep the information discussed earlier (results of Exploration Workshop) in mind when writing up objectives. Each small group provides feedback to the bigger group.
8. Monitoring and evaluation
- 40 minutes
- 12:20pm
Give a short overview of the concepts in Section 5. Use Tool 9: Monitoring Summary to see that everything you planned gets done.
Divide participants into small groups of approximately five people. Make sure participants understand what they need to do by going through the tool with them, using examples. Let each group complete the tool by brainstorming. Remind them that they must keep the information discussed earlier (results of Exploration Workshop) in mind when writing up objectives. Each small group provides feedback to the bigger group. Discuss Tools 10, 11 and 12 with the group and explain when to use them.
These activities can be done in one day or over several sessions depending on how much time people have available. The allocated time and starting times indicated can be adjusted to suit each workshop as needed.
Use the following draft documents to tell people about your natural playground.
Sample meeting invitation
WE NEED YOUR HELP!
Saturday 18 October, 9am to 11am at The Most Fantastic ECD Centre
Dear
The Most Fantastic Pre‐School is planning an exciting new natural playground. Please join us for an informational meeting to find out how a natural playground can benefit our children. Learn more and come and help us think.
Many of you will still remember playing outside until your parents called you. Today’s children are experiencing a different kind of childhood. Television and mobile phones mean that many children spend as little as thirty minutes in free, outdoor play each day. Research shows that playing outside can improve vision, reduce ADHD symptoms, improve school performance, reduce anxiety, and encourage a love for exercise.
A natural playground provides simple structures and natural materials that inspire imagination! Rocks, sand, hollow logs and water encourage climbing, construction, experimentation and problem‐solving.
The Most Fantastic Pre‐School values your input on this project, and your support will help us to put a plan into action. The meeting will be hosted by Ms. E.C Diva at The Most Fantastic Pre‐School.
Please let us know if you can make it at 555 555 5555.
Yours in playing,
Ms E.C. Diva
Sample introduction letter to parents
Dear Parents
We send this letter in case you missed our last meeting where we discussed the new way of play we are embracing at our school.
We are excited to announce that we are introducing loose parts play in the Most Fantastic Pre‐School.
Staff will be encouraging children to use their imagination by playing with resources including cardboard boxes, tyres, baskets, old sheets, wooden planks and plastic gutters. These are called ‘loose parts’. They can be used in many different ways, allowing children to make anything from a pirate ship or castle to a road or house.
Loose parts play will happen in and out of class time. It will be a chance for children to play freely with friends, investigate, discover, explore, create, use lots of trial and error to learn for themselves, learn to make their own judgments about adventurous play, and recognising safety limits.
Please ensure your children are dressed for the weather so they can join in properly – they might need a raincoat or sunscreen, sun hats, or a spare set of clothes depending on the weather.
- Staff and children will be working together to start the loose parts play.
- Staff will receive additional information on loose parts play.
- Issues including how to use the resources safely have been investigated.
- Children will be involved in discussing health and safety issues.
- All items will be checked initially and on a regular basis for safety.
Parents and carers, would you like to come and see what’s happening? Do you want to understand why we are moving to this type of play? Phone me on 555 555 5555 so we can arrange a time to meet.
Do you have any resources to donate? We will need loose parts to keep things interesting.
Let us know if you’d like someone to collect donated items.
Yours in playing,
Ms E.C. Diva
Sample play policy
The Most Fantastic Pre-School recognises that:
- Children have the right to play.
- Play is the work of a child.
- It is important to have enough time and good places to play freely.
Playing is one of the most important aspects of a child’s life.
Playing helps children be healthy, well, and happy.
Playing is the way that children learn best, and it makes them positive about learning later in life.
Most importantly, playing improves children’s ability to develop and grow.
We value the children’s urge and desire to play and therefore aim to provide for a broad range of play opportunities within the school playgrounds before, during, and after the school day.
The Most Fantastic Pre-School recognises that:
- Children will naturally create and/or seek out challenging situations.
- Some children may have accidents, get dirty, wet or upset when playing.
- Any potential risk of harm to children needs to be balanced with the benefits that free play offers.
We will do our best to avoid children getting hurt by providing supervision for the play opportunities that we provide.
The Most Fantastic Pre-School believes that adults’ attitudes towards, and understanding of, children’s play will have a huge effect on the quality of the play opportunities we offer at school and at home. We will, therefore, seek out training opportunities and support research among our staff so that they are confident to facilitate children’s freely chosen, self‐directed play. We will do our best to advocate play with parents when we have meetings.
Using coaching
Coaching is done to improve performance and to develop specific skills, in our case this is the development of a natural playground. Coaching usually takes place on a face‐to‐face, one‐to‐one basis and has a very specific planned programme with a short timeframe. For a coaching relationship to work, it must be based on a foundation of mutual respect and willingness to participate.
Coaching is an effective development approach because it:
- Develops competencies, skills and abilities.
- Provides corrective feedback to the participant.
- Empowers participants to learn and grow.
- Helps participants clarify their thinking.
- Identifies and solves problems.
- Makes decisions, implements changes, and overcomes obstacles.
- Provides flexibility in the learning process.
- Helps participants to implement new knowledge and skills into their practice.
Coaching for the natural playground workshops
The goals of using coaching sessions as part of the Natural Playground process is to work with the participant to solve implementation problems and to improve the quality of natural playgrounds that are developed at schools and in the community. The ideal situation is that each participant is paired with a coach to reach these goals.
Skills and qualities for coaches
- Loose parts
- Loose parts are materials with no specific set of directions that can be used alone or combined with other materials. They can be moved, carried, combined, redesigned, lined up, taken apart and put back together in multiple ways.
- Free play
- Unstructured, voluntary, child‐initiated activity that allows children to develop their imaginations while exploring and experiencing the world around them. It is driven by children’s natural curiosity, love of discovery, and enthusiasm.
Coaches assist participants to develop to their full potential. They help participants grow and develop a skill by analysing their performances, instructing in relevant skills and by providing encouragement. Coaches should be:
Good communicators
Coaches should have strong written and verbal communication skills. They must have an excellent ability to listen, good presentation skills, ability to summarise information, and experience in giving feedback. Coaches can recognise changes in mood and body language and adapt as needed. They should also have the ability to write action plans, SMART goals, and summarise discussions.
Knowledgeable on the relevant coaching topics
Coaches should be knowledgable of all the topics and tools covered in the Natural Playgrounds Toolkit, such as early childhood development, children’s developmental needs, play, natural playgrounds, loose parts, free play, design processes, and the grade R curriculum.
Experienced in training or coaching sessions
For example, they should have experience in generating new ideas, encouraging participation, managing disagreements, facilitating a process, and guiding participants.
Strong in soft skills
Coaches should be emotionally intelligent, be good with people and able to establish trust and rapport with people. Coaches can build warm, confidence‐inspiring relationships.
Non‐judgmental, respectful, and accepting of other people
Coaches should remain objective and impartial and be understanding and compassionate of the participant and maintain confidentiality.
Respectful
A coach does not treat participants like children, wanting to solve their problems for them, rather a coach sees the participant as able, responsible, resourceful and capable to choose.
Up to date
A coach is willing to commit time and energy to learn coaching skills.
| Coaching do’s | Coaching don’ts |
|---|---|
| Serve as a facilitator. | Tell participants what to do. |
| Serve as a non-judgemental outsider. | Grade participants’ ideas, plans or actions. |
| Use a defined model. | Dictate all the details. |
| Ask questions. | Provide answers or solve problems. |
| Listen. | Be the expert. |
| Ask for details. | Dwell on mistakes. |
| Serve as a sounding board. | Act as a therapist. |
| Challenge perceptions. | Argue that participants are wrong. |
| Focus on the future. | Dwell on the past. |
| Call for action. | Insist or demand. |
| Challenge participants to meet their goals. | Be afraid to give feedback to participants. |
The do’s and don’ts of coaching
Figure 18 The do’s and don’ts of coaching
Coaching model for the natural playground process
There are many different coaching models in circulation. The one that will work well in the natural playground process is the GROW model that stands for Goal, Reality, Options, Way forward. It provides a structure for coaching discussions. The model places the responsibility for development on the participant. They must come to the coaching session with goals for discussion.
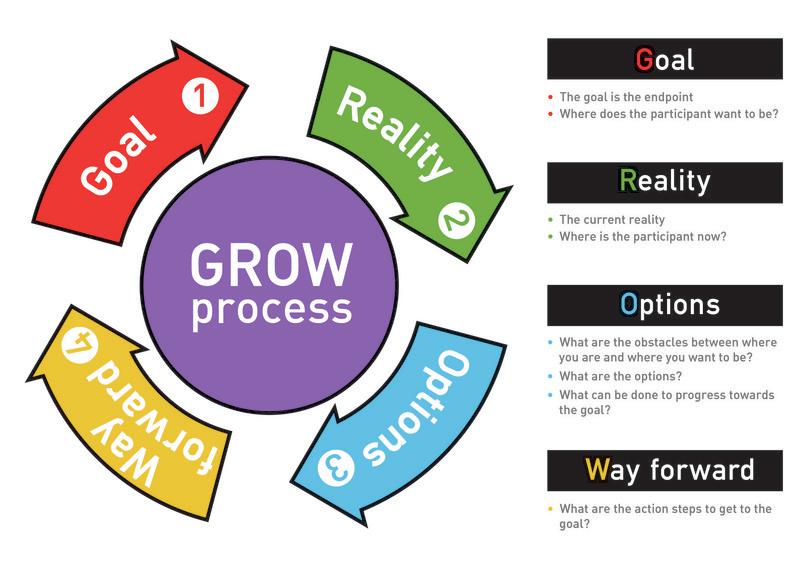
The GROW model.
Figure 19 The GROW model.
The GROW model is used as a discussion tool with four stages for each coaching session.
| Stage 1 Goal: | The participant brings the issue they want to work on and solve to the session and writes it down. The coach uses questioning and listening skills to help the participant to define exactly what they want to achieve. |
| Stage 2 Reality: | The coach uses questioning and listening skills to help the participant define the issues that need to be addressed. The participant talks about the reality they are facing (issues and obstacles) and writes it down. |
| Stage 3 Options: | The coach uses questioning and listening skills to help the participant to identify obstacles and options. The participant brainstorms obstacles and options and writes it down. |
| Stage 4 Way forward: | The coach helps the participant to develop an action plan to establish what specific actions the participant will take. Gives feedback on the participants’ progress. The participant writes down an action plan and makes sure to implement it before the next coaching session. |
Using group study
Group study is when a small group of people meet regularly to discuss toolkit material. Each group is unique and benefits from the backgrounds and abilities of all of its members. Forming study groups is a strategy to supplement learning. Groups can share unique insights and learn from each other. For group study to be effective, a leader that is more experienced or has a higher level of education is a prerequisite.
Benefits of group study
Improve your notes
Comparing notes allows participants to fill in any information or important concepts they may have missed.
Sharing talents
Groups provide participants an opportunity to benefit from the talents and knowledge of the other group members.
Support system
Group is a great way to give and receive motivation and support from fellow students.
It makes learning fun
Studying in a group environment breaks the monotony of spending long hours studying on your own.
Group study in the natural playground process
The goals of using group study in the natural playground process is to create an environment where:
- Participants can motivate and encourage each other to progress and avoid procrastination.
- Participants can bring and discuss questions about the toolkit material.
- Participants can ask and discuss practical questions about the implementation of the learning.
Group study sessions should include foundation phase teachers with Grade R teachers. The group study can follow the structure of the guided self‐study toolkit outline. Give members time (one week) to work through a section on their own and then discuss that section at the group study session.
Skills and qualities for group study leaders
The group study leader should have a higher qualification or more experience than the rest of the group. They should be able to keep the group focused on the agenda and goals for the day and keep the group study session from becoming a social group. Groups can always socialise at other times. They must see that each group member does their share by preparing for the session and ensure that no one dominates the group. It is important that all members have an equal opportunity to participate.
Forming a group study
Study groups are effective only if they are taken seriously and conducted regularly with a key focus every time.
Use the following guidelines when forming a group study.
How many:
Group study sessions are best kept smaller with three to six participants.
Who:
Group study sessions should be have participants with the same goals, such as working through, understanding, and implementing the Natural Playgrounds Toolkit.
Duration:
Keep your sessions between one to two hours long. Anything longer is difficult to fit into busy schedules.
When:
Try to have the group study in the same place and on the same day and time every week. This will help people to remember when to attend.
Where:
Make sure you do it in a location with none or very little distractions and where group members can communicate freely.
Managing a successful study group
Decide on basic ground rules to keep order and structure
Make rules about participation, cell phone use, respect for each other, keeping to the agenda and so on.
Create clear goals and objectives for every study session
Knowing what you want to achieve in a study session will help keep the group on target and prevent you from losing track of time.
Be prepared
Unprepared participants are a frustration to themselves and the members who did prepare. Each member should review the material and make notes on insights they had and questions they want to discuss
Ensure participation
In this way everyone has an equal opportunity to benefit from the group. A good way is to assign topics to each person to lead the discussion on.
Be willing to ask for help
No one knows everything, and that is okay. If there is a disagreement in the group on a topic, commit to get the answers from a senior staff member and get back to the group.
Stay focused
Before each session, someone should be assigned to lead the session. The leader must ensure the group sets goals, is productive, stays on track and achieves all the goals. Remember to take a break during the study session.
Using guided self-study
Guided self-study handbooks allow independent learning in a structured format delivered entirely online or electronically. Participants are given all the materials needed to complete the process without supervision or attending classes. Guided self‐study fosters a self‐reliant learning experience where participants work through the content provided in the toolkit completely autonomously.
Benefits of guided self‐study
Fewer distractions
You face fewer distractions when you are on your own. This helps you to get focused and stay focused.
Control your study environment
When you study on your own, you can choose the environment that is perfect for you; maybe you like soft background music, a desk and bright lights.
Control your study schedule
Some people prefer to work at night, others early in the morning. Some need a break every 30 minutes, others can work for two to three hours at a time. Some want to study every day, others want to study twice a week.
Control your study agenda
Studying on your own gives you the freedom to spend more time on a specific topic, even doing more research on it, if you are interested in it or want to understand it better.
Guided self‐study in the natural playground process
The goal of using guided self‐study in the natural playground workshops is to encourage participants to explore topics and assist participants to develop study skills.
Participants are required to keep a study journal. After each topic, there are self‐reflective questions that need to be answered before they can progress. The answers, in addition to any other notes participants wish to make, are written in the study journal.
In addition, coaching and group study sessions are available to discuss and clarify the topics further.
Managing to be successful at guided self‐study
Before you start studying, clarify the following for yourself:
Are you ready to learn?
- Do you believe you can do it? If not, consider what you need to do to believe in yourself. What is your mindset? Are you positive? Do you believe you can grow?
- Are you organised? Do you have a place and time to learn? Did you inform family members? Do you have access to the internet and a device to go online? Do you have a notebook (study journal) and pens? Did you switch off everything that can distract you?
- Are you self‐disciplined? Can you stick to your decisions or do you need to ask someone to hold you accountable?
- Can you be honest with yourself? Self reflection and self‐evaluation is part of learning. If you want to improve, research information on how to improve your self‐reflection skills. If you do not stop and pause to consider what you have learned, you do not give your brain a chance to evaluate and integrate the information.
Do you have learning goals?
- Set timeline goals for each module and the entire process and clearly indicated when you want to complete it. If you are part of a group‐study or have a coach, this may influence your timing.
- Set your own goals for what you want to achieve by completing the playground.
How do I learn best?
- Can you sit quietly and read the material? Do you need to take notes or draw pictures to understand the material? Do you need to find someone to tell them what you learned so that you can remember it?
- Do you need to go and do what you learned to remember it? You can read up on learning styles if you are unsure how you learn best. When you know your preference, find ways to make it work for you.
How do I know that I am learning?
It is important to reflect on what you have learnt. After each topic answer these three reflective questions honestly:
- What information surprised you?
- What do you know now that you didn’t know before?
- What will you do better or differently from now on?